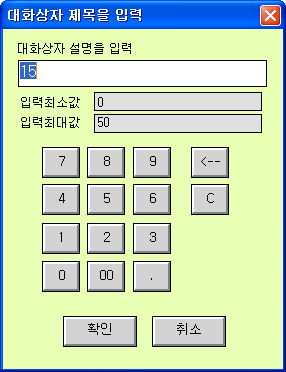
The output dialog box of graphic module can be used as AO, DO and St tag output box on localmain by making it, and the screen is configured as follows so that users can input at figures by configuring an output box screen.
<Ficture 1> Screen configuration of user-defined output dialog box
Description of <Ficture 1>
Description of screen configuration
Script button from 0 to 9
Back, Clear, Apply, Cancel and Close button
Single line text that guides inputable Full and Base of AI tag
String tag that allows user to view the entered value (string tag: NUMBER)
Configure the screen as above.
Write script to 'Script on Module Opened'
buf = @SystemValueGet("UserControlBoxTag"); // Get the AI, DI tag name specified in the properties of the corresponding object
value = @GetTagValue(buf); // Store value of the tag.
@EditBoxSetText("this.EditBox1", value); // Display the value to the tag in EditBox1 on the screen
buf = @SystemValueGet("UserControlBoxDescription"); // Get the dialog description specified in the ControBox tab of the the properties of the corresponding object.
@ObjectSetText("this.SingleTextDescription", buf); // Display it to the single text object of graphic module
buf = @SystemValueGet("UserControlBoxMinValue"); // Get the minimum value in the range of the AI tag.
@ObjectSetText("this.SingleTextMinValue", buf);
buf = @SystemValueGet("UserControlBoxMaxValue"); // Get the maximum value on the range of the AI tag
@ObjectSetText("this.SingleTextMaxValue", buf);
@EditBoxSetFocus("this.EditBox1");
@EditBoxSelectAll("this.EditBox1");
Write script to each button
Write script to each button. A brief view of‘Button 1’is shown in <Figure 2> below.
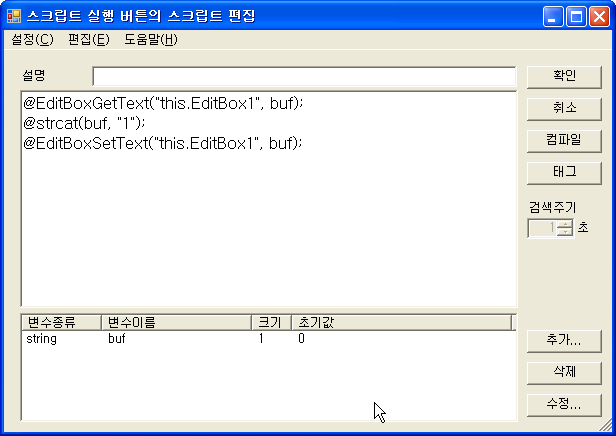
<Figure 2> Script of ‘Button 1’
An example of ‘Button 1’ is shown in <Figure 2>, and for each button, write it as follows.
this: The reserved word specified in the AutoBase script means a module that is currently active, and if designated as this.EditBox1, even if the class name used by several graphic modules has EditBox1, it is applied only to EditBox1 of the current graphic module.
Button 0
@EditBoxGetText("this.EditBox1", buf);
@strcat(buf, "0");
@EditBoxSetText("this.EditBox1", buf);
Button 1
@EditBoxGetText("this.EditBox1", buf);
@strcat(buf, "1");
@EditBoxSetText("this.EditBox1", buf);
Button 2
…
…
…
Button 9
@EditBoxGetText("this.EditBox1", buf);
@strcat(buf, "9");
@EditBoxSetText("this.EditBox1", buf);
Button Back
@EditBoxGetText("this.EditBox1", buf);
count = @strlen(buf);
if(count == 0) return;
buf[count-1] = 0;
@EditBoxSetText("this.EditBox1", buf);
//EditBox1에 입력되어진 문자 배열의 길이에서 -1을 하여 Null값을 입력
Button Clear
buf = "";
@EditBoxSetText("this.EditBox1", buf);
Button Apply
@EditBoxGetText("this.EditBox1", buf);
value = @atof(buf);
$__ControlBox_Tag = value; //$__ControlBox_Tag 지정된 태그의 입/출력로 출력 값 전달하여 출력
@CloseModule();
Button Close
@CloseModule(); // Close screen of key pad.
Refer to the example by selecting the menu "File | Restore" in the project manager program.