ELVIC communication driver is the driver to communicate with power meter controller of Asia Co,. Ltd. in Korea.
Note) ELVIC communication driver use MODBUS protocol basically.
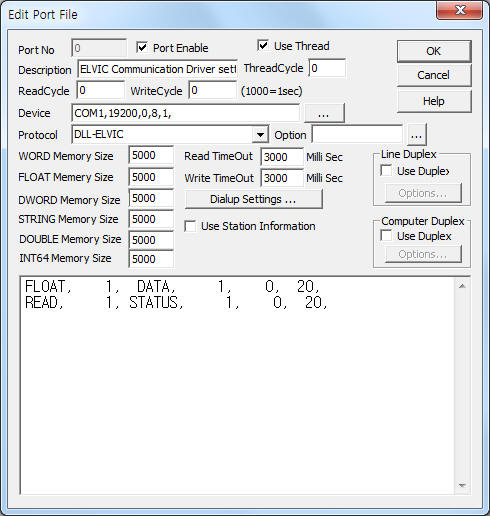
<Figure 1> is read setting example of ELVIC communication driver.
 |
| <Figure 1> Read setting example of ELVIC communication driver |
Device part of <Figure 1> input Com Port(COM1), Baud Rate(19200), Parity Bit(0), Data Bit(8), Stop Bit(1) respectively, according to setting of controller.
ELVIC controller can set baud rate(300, 600, 1200, 2400,4800, 9600, 19200 ¡¦ ), parity bits(0, 1, 2), stop bits(1, 2) by using front panel's setting switch.
ELVIC communication driver¡¯s read schedule
Read schedule setting parameters are as follows:
1) Station – Controller station number = 1 ~ 255.
2) Read Command – Command = DATA, STATUS, WORD, FLOAT. ( Refer to <Table 1> ~ <Table 4> )
DATA : read of basic Analog Data, ( Refer to <Table 1>, <Table 2> )
STAUTS – read of power meter's status, ( Refer to <Table 3>, <Table 4> )
WORD – word unit data read of Modbus protocol, (save at WORD memory)
FLOAT – float unit data read of Modbus protocol. (save at FLOAT memory)
3) Read Start Address – Read start address of Modbus protocol when WORD, FLOAT read command.
4) Save start address for Communication Server – Saving start address of Communication Server.
5) Read Size – read size of word/float unit. ( Refer to <Table 1> ~ <Table 4> )
Read schedule example)
FLOAT, 1, DATA, 1, 0, 20,
READ, 1, STATUS, 1, 0, 20,
<Table 1> is data saving address and contents of 'DATA' read command for 1 controller station.
<Table 2> is data saving address and contents of 'DATA' read command according to the station.
Data Saving Address |
Contents |
modbus address (decimal) |
Start Add + 0 ~ 3 |
Voltage of R, S, T, N phase |
30001~ 30008 |
Start Add + 4 ~ 7 |
Current of R, S, T, N phase |
30009~ 30016 |
Start Add + 8 ~ 10 |
Power factor of R, S, T phase |
30017~ 30022 |
Start Add + 11 |
Frequency |
30023~ 30024 |
Start Add + 12 |
Power of 3 phase |
30025~ 30026 |
Start Add + 13 |
Reactive power of 3 phase |
30027~ 30028 |
Start Add + 14 |
Power amount of 3 phase |
30029~ 30030 |
Start Add + 15 |
Reactive power amount of 3phase |
30031~ 30032 |
Start Add + 16 |
Zero voltage |
30033~ 30034 |
Start Add + 17 |
Zero current |
30035~ 30036 |
Start Add + 18 |
Phase difference |
30037~ 30038 |
| <Table 1> Data saving address and contents of 'DATA' read command for 1 controller station | ||
ELVIC Station Address |
Contents |
modbus address (decimal) |
1 |
Equal to <Table 1> |
30001~ 30050 |
2 |
30051~ 30100 |
|
3 |
30101~ 30150 |
|
4 ~ 19 |
30151~ 30950 |
|
20 |
30951~ 31000 |
|
| <Table 2> Data saving address and contents of 'DATA' read command according to the station | ||
<Table 3> is data saving address and contents of 'STATUS'(Digital Input) read command for 1 controller station.
<Table 4> is data saving address and contents of 'STATUS'(Digital Input) read command according to the station.
Data Saving Address |
Bit |
Status |
Contents |
modbus address (decimal) |
Start Add + 0 |
0 (LSB) |
OCR |
Overcurrent relay |
10001 |
1 |
OCGR |
ground overcurrent relay |
10002 |
|
2 |
OVR |
Over voltage |
10003 |
|
3 |
OVGR |
ground overvoltage relay |
10004 |
|
4 |
UVR |
undervoltage relay |
10005 |
|
5 |
SGR |
selection ground relay |
10006 |
|
6 |
TIME |
Don't operate : 0, Temporary operate : 1 |
10007 |
|
7 |
INST |
Don't operate : 0, Temporary operate : 1 |
10008 |
|
8 |
CB_STATUS |
Circuit breaker OFF : 0, Circuit breaker ON : 1 |
10009 |
|
9 |
REM/LOC |
REMOTE : 0, LOCAL : 1 |
10010 |
|
A |
DI#1 |
Digital input #1 |
10011 |
|
B |
DI#2 |
Digital input #2 |
10012 |
|
C |
DI#3 |
Digital input #3 |
10013 |
|
D |
DI#4 |
Digital input #4 |
10014 |
|
E |
X |
Don't care |
10015 |
|
F(MSB) |
COMM |
Error : 0, Normal : 1 |
10016 |
|
| <Table 3> Data saving address and contents of 'STATUS'(Digital Input) read command for 1 controller station | ||||
ELVIC Station Address |
Contents |
modbus address (decimal) |
1 |
Equal to <Table 3> |
10001~ 10016 |
2 |
10017~ 10032 |
|
3 |
10033~ 10048 |
|
4 ~ 19 |
10049~ 10304 |
|
20 |
10305~ 10320 |
|
| <Table 4> Data saving address and contents of 'STATUS'(Digital Input) read command according to the station | ||
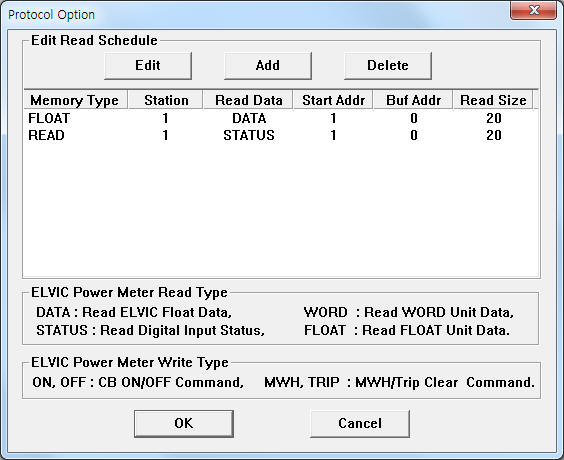
If you click the icon ![]() in protocol option part, you
can see the dialogue box such as <Figure 2>. you can also set read schedule by
using this part.
in protocol option part, you
can see the dialogue box such as <Figure 2>. you can also set read schedule by
using this part.
 |
| <Figure 2> Example of ELVIC communication driver¡¯s Option dialogue box |
You can set read schedule by using ![]() ,
, ![]() ,
, ![]() button and listbox
of <Figure 2>.
button and listbox
of <Figure 2>.
 |
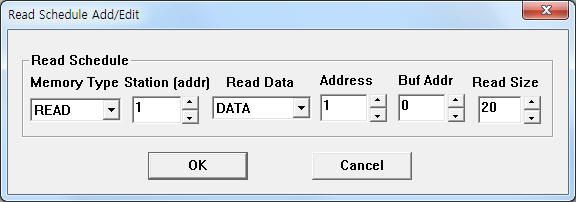
| <Figure 3> Example of ELVIC communication driver¡¯s read schedule Add/Edit dialogue box |
When you click Add button or Edit button in dialogue box of <Figure 2>, dialogue box of <Figure 3> is shown.
You can write setting value by using write settings.
Digital Write
Digital write setting parameters are as follows:
1) PORT Port no. (0 ~ 255)
2) STATION Controller station number = 1 ~ 255.
3) ADDRESS Write address(decimal unit).
ON, OFF, MWH, TRIP write command = Equipment address of ELVIC Power Meter,
ADDR write command = Write address.
4) Extra1 Write command.
ON : CB ON write command. ( only writable when 'REMOTE' status),
OFF : CB OFF write command. ( only writable when 'REMOTE' status),
MWH : WMH Clear(Reset) write command,
TRIP : TRIP Clear(Reset) write command,
ADDR : Write command according to modubs address.
5) Extra2 Don't care.
Write example 1)
Port : 0, Station : 1, Address : 0001, Extra1 : ON, EXTRA2 : , Write value = On( 1 )
The setting parameter shown above is CB ON control example of 1 ELVIC power meter, 1 controller station number.( when 'REMOTE' status),
Write example 2)
Port : 0, Station : 1, Address : 0001, Extra1 : OFF, EXTRA2 : , Write value = On( 1 )
The setting parameter shown above is CB OFF control example of 1 ELVIC power meter, 1 controller station number.( when 'REMOTE' status),
Write example 3)
Port : 0, Station : 1, Address : 0002, Extra1 : MWH, EXTRA2 : , Write value = On( 1 )
The setting parameter shown above is MWH clear example of 2 ELVIC power meter, 1 controller station number.
Write example 4)
Port : 0, Station : 2, Address : 0003, Extra1 : TRIP, EXTRA2 : , Write value = On( 1 )
The setting parameter shown above is TRIP clear example of 3 ELVIC power meter, 2 controller station number.
Analog Write
Analog write and digital write have the same setting parameters except output value.
Connection of communication cable and main power line are as follows.
Connection of communication cable
Please connect ELVIC controller¡¯s COMM+, COMM- connector( Refer to <Figure 4> ) and LCC controller's 2, 3 connector of SCP1( Refer to <Figure 7> ) respectively.
Also connect A 100-ohm resistor at both ends of connector.
ELVIC Power Meter LCC Station
COMM + --------------------------- 2 connector of SCP1 (2nd pin from upper)
COMM- --------------------------- 3 connector of SCP1 (3rd pin from upper)
<Figure 4> is rear panel connector of ELVIC power meter.
 |
| <Figure 4> Rear panel connector of ELVIC power meter |
Connection of main power line
Please connect main power to P1, P2 connector, 100 ~ 230V AC such as <Figure 4>.
Connection of main power to LCC communication station
Please connect 220V AC power to LCC communication station's main power line such as <Figure 5>.
 |
| <Figure 5> Rear side appearence of LCC comunication station |
 |
| <Figure 6> Front side appearence of ELVIC power meter |
Connection of communication cable between computer and LCC communication station
Please connect normal serial communication cable between computer and LCC communication station( at SCP 3 connector ) such as <Figure 7>.
 |
| <Figure 7> Front side appearence of LCC comunication station |
Connection for TCP/IP communication
You can use TCP/IP communication by using serial -> ethernet converter such as 'Port Server'. ( Refer to <Figigure 8> )
 |
| <Figure 8> Appearence of Serial -> Ethernet 'Port Server' communication converter |
Setting of meter address and baud rate
You can set ELVIC controller's meter address(1 ~ 247) and baud rate by using front panel's setting button.