Johnson Controls DX9100 communication driver is the driver to communicate with DX9100 controller of Johnson Controls, Inc. in U.S.A.
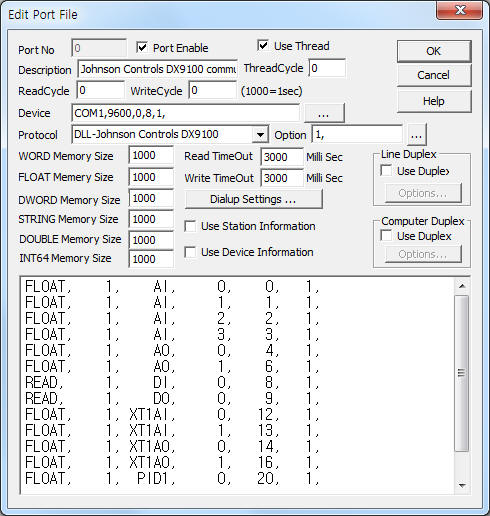
<Figure 1> is read setting example of Johnson Controls DX9100 communication driver.
 |
| <Figure 1> Read setting example of Johnson Controls DX9100 communication driver |
Device part of <Figure 1> input Com Port(COM1), Baud Rate(9600), Parity Bit(0), Data Bit(8), Stop Bit(1) respectively, according to setting of controller.
Also you can set 'use of CheckSum data' (0 = don't use, 1 = use, default : 1) by using option part.
Johnson Controls DX9100 communication driver¨s read schedule
Read schedule setting parameters are as follows:
1) Station – 1 ~ 255 DX9100 controller station number.
2) Read Data Type – read data type = AI, AO, DI, DO, XT1AI, XT2AI, ・. ( Refer to <Table 1> )
3) Read Start Address – reading start address of memory.
4) Save start address for Communication Server – saving start address of Communication Server.
5) Read Size – fixed to 1. (AO, XT1~8AO : 2 data)
Read schedule example)
FLOAT, 1, AI, 0, 0, 1,
FLOAT, 1, AI, 1, 1, 1,
FLOAT, 1, AI, 2, 2, 1,
FLOAT, 1, AI, 3, 3, 1,
FLOAT, 1, AO, 0, 4, 1,
FLOAT, 1, AO, 1, 6, 1,
READ, 1, DI, 0, 8, 1,
READ, 1, DO, 0, 9, 1,
FLOAT, 1, XT1AI, 0, 12, 1,
FLOAT, 1, XT1AI, 1, 13, 1,
FLOAT, 1, XT1AO, 0, 14, 1,
FLOAT, 1, XT1AO, 1, 16, 1,
FLOAT, 1, PID1, 0, 20, 1,
FLOAT, 1, PID1, 1, 21, 1,
<Table 1> is data type and contents for Johnson Controls DX9100 communication driver.
Data type |
Contetns |
Range |
Data saving address |
Remarks |
AI |
analog input |
0 ~ 7 (AI1 ~ 8) |
Start addr + 0 : current value(Float) |
read only |
AO |
analog output |
0 ~ 7 (AO1, AO2, AO9 ~ AO14) |
Start addr + 0 : Override status value, (0 : Release, 1 = Override), Start addr + 1 : current value(Float) |
|
DI (or BI) |
digital input |
0 (DI1 ~ 8) |
Start addr + 0 : 8 current value for each bit ( 0 bit : DI1, 1 bit : DI2,・ 7bit : DI8 ) |
read only |
DO (or BO) |
digital output |
0 (DO3 ~ 8) |
Start addr + 0 : Override status for 8 ~ D bit, (8bit : DO3, ・, Dbit = DO8), Start addr + 1 : current value for each bit ( 0 bit : DO3, 1 bit : DO4,・ 5 bit : DO8 ) |
Override value for each bit 0 : Release, 1 = Override |
XT1ST, ・XT8ST |
extension module 1 ~ 8 status value |
0 (always 0) |
Start addr + 0 : status value (WORD) |
10h(16) = exist extension module |
XT1AI, ・XT8AI |
extension module 1 ~ 8 analog input |
0 ~ 5 (AI1 ~ 6) |
Start addr + 0 : current value(Float) |
read only |
XT1AO, ・XT8AO |
extension module 1 ~ 8 analog output |
0 ~ 1 (AO7 ~ 8) |
Start addr + 0 : Override status, (14, 15 bit = AO7, AO8 Over status, 0 : Release, 1 = Override), Start addr + 1 : current value(Float) |
|
XT1DI, ・XT8DI |
extension module 1 ~ 8 digital input |
0 (DI1 ~ 8 or DI1 ~ 4) |
Start addr + 0 : current value for 0~4 or 0~7 bit ( 0 bit : DI1, 1 bit : DI2,・ 7bit : DI8 ) |
read only |
XT1DO, ・XT8DO |
extension module 1 ~ 8 digital output |
0 (DO1 ~ 8 or DO5 ~ 8) |
Start addr + 0 : Override status for 0~7 or 4~7 bit, (each bit 0 : Release, 1 = Override), Start addr + 1 : current value for each bit ( 0 bit : DO1, 1 bit : DO2,・ 7 bit : DO8 ) |
|
PID1, ・PID12 |
PID 1 ~ 12 analog setting value |
0 ~ |
Start addr + 0 : current PID analog setting value |
refer to DX9100 manual for more PID address and contents |
PIDB1, ・PIDB12 |
PID 1 ~ 12 digital setting value |
0 ~ |
Start addr + 0 : current PID digital setting value |
|
LRS1 |
LRS1 ~ 32 digital value |
0 ~ 1 |
Start addr + 0 : LRS value for each bit (when read start address = 0, 0 bit : LRS1, 1 bit : LRS2, ・ 15 bit : LRS16 ) |
|
LRS2 |
LRS33 ~ 64 digital value |
0 ~ 1 |
Start addr + 0 : LRS value for each bit (ehen read start address = 0, 0 bit : LRS33, 1 bit : LRS34, ・ 15 bit : LRS48 ) |
|
ACO |
ACO1 ~ 8 analog value |
0 ~ 7 |
Start addr + 0 : ACO analog current value (read start address = 0 – ACO1, ・, 7 – ACO8 ) |
|
DCO |
DCO1 ~ 32 digital value |
0 ~ 1 |
Start addr + 0 : DCO value for each bit (when read start address = 0, 0 bit : DCO1, 1 bit : DCO2, ・ 15 bit : DCO16 ) |
|
TS |
Time Schedule
1 ~ 8 digital value |
0 ~ 7 |
Start addr + 0 : readed Time Schedule digital value (read start address = 0 – TS1, ・, 7 – TS8 ) |
0 bit : Out Override status, 1 bit : Out On/Off value, 2 bit : Exe current value |
OS |
Optimum
Start Stop 1 ~ 2 digital value |
0 ~ 1 |
Start addr + 0 : readed Optimum Start Stop digital value (read start address = 0 – OS1, 1 – OS2 ) |
0 bit : Out Override status, 1 bit : Out On/Off value |
AD |
analog value read for specified address |
0 ~ |
Start addr + 0 : analog current value(Float) |
refer to DX9100 manual for more address and contents |
DD |
digital value read for specified address |
Start addr + 0 : digital current value(8bit or 16bit) |
||
| <Table 1> Data type and contents for Johnson Controls DX9100 communication driver | ||||
Johnson Controls DX9100 communication driver store the same data in WORD, DWORD, FLOAT memory, but the data format are different.
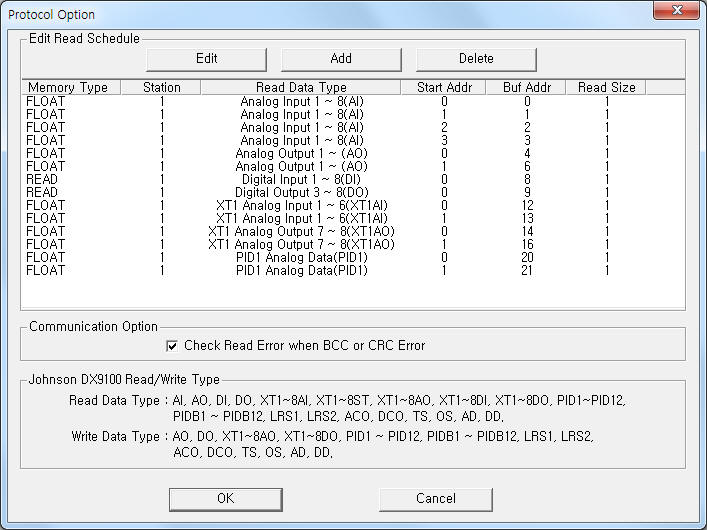
If you click the icon ![]() in protocol option part, you
can see the dialogue box such as <Figure 2>. you can also set read schedule by
using this part.
in protocol option part, you
can see the dialogue box such as <Figure 2>. you can also set read schedule by
using this part.
 |
| <Figure 2> Example of Johnson Controls DX9100 communication driver¨s Option dialogue box |
You can set read schedule by using ![]() ,
, ![]() ,
, ![]() button and listbox of <Figure
2>.
button and listbox of <Figure
2>.
Also, you can set use of CheckSum data by using the part of `Check Read Error when BCC or CRC Error¨ shown in <Figure 2>.
 |
| <Figure 3> Example of Johnson Controls DX9100 communication driver¨s read schedule Add/Edit dialogue box |
When you click Add button or Edit button in dialogue box of <Figure 2>, dialogue box of <Figure 3> is shown.
You can control and write the setting value by using write settings.
Digital Write
Digital write setting parameters are as follows:
1) PORT Port no. (0 ~ 255)
2) STATION 1 ~ 255 DX9100 controller station number.
3) ADDRESS writing memory address.
higher 3 ~ 7 digit = decimal unit writing address,
lower 1 digit 0 ~ F bit writing address.
4) Extra1 Writing data type = AI, AO, DI, DO, XT1AI, XT2AI, ・. ( refer to <Table 1> )
5) Extra2 selection use of Override Release when direct output. 1 = Override, 0 = normal output.
AO, DO, XT1AO ~ XT8AO, XT1DO ~ XT8DO data type = direct output. ( can set Override Release selection )
other data type = don't care.
Write example 1)
PORT:0, station:1, ADDRESS:0000, Extra1:DO, Extra2 : 0
The setting parameter shown above is a control(On/Off) example of DO3. ( must set after Override setting)
Write example 2)
PORT:0, station:1, ADDRESS:0003, Extra1:DO, Extra2 : 0
The setting parameter shown above is a control(On/Off) example of DO6. ( must set after Override setting)
Write example 3)
PORT:0, station:1, ADDRESS:0005, Extra1:DO, Extra2 : 1
The setting parameter shown above is Override Release setting example of DO8.
Write example 4)
PORT:0, station:1, ADDRESS:0001, Extra1:XT1DO, Extra2 : 0
The setting parameter shown above is a control(On/Off) example for DO2 of extension module 1. ( must set after Override setting)
Write example 5)
PORT:0, station:1, ADDRESS:0007, Extra1:XT1DO, Extra2 : 1
The setting parameter shown above is Override Release setting example for DO8 of extension module 1.
Write example 6)
PORT:0, station:1, ADDRESS:0000, Extra1:TS, Extra2 : 0
The setting parameter shown above is 0( 1st ) bit control( Out Override ) example for TS1.
Write example 7)
PORT:0, station:1, ADDRESS:0001, Extra1:TS, Extra2 : 0
The setting parameter shown above is 1( 2nd ) bit control( Out On/Off ) example for TS1.
Analog Write
Analog write setting parameters are as follows:
1) PORT Port no. (0 ~ 255)
2) STATION 1 ~ 255 DX9100 controller station number.
3) ADDRESS decimal unit writing memory address.
4) Extra1 Writing data type = AI, AO, DI, DO, XT1AI, XT2AI, ・. ( refer to <Table 1> )
5) Extra2 selection use of Override Release when direct output. 1 = Override, 0 = normal output.
AO, DO, XT1AO ~ XT8AO, XT1DO ~ XT8DO data type = direct output. ( can set Override Release selection )
other data type = don't care.
Write example 1)
PORT:0, station:1, ADDRESS:0000, Extra1:AO, Extra2 : 0
The setting parameter shown above is setting example for AO1. ( must set after Override setting)
Write example 2)
PORT:0, station:1, ADDRESS:0002, Extra1:AO, Extra2 : 0
The setting parameter shown above is setting example for AO9. ( must set after Override setting)
Write example 3)
PORT:0, station:1, ADDRESS:0007, Extra1:AO, Extra2 : 0
The setting parameter shown above is Override Release setting example of AO14.
Write example 4)
PORT:0, station:1, ADDRESS:0000, Extra1:XT2AO, Extra2 : 0
The setting parameter shown above is setting example for AO7 of extension module 2. ( must set after Override setting)
Write example 5)
PORT:0, station:1, ADDRESS:0001, Extra1:XT2AO, Extra2 : 1
The setting parameter shown above is Override Release setting example for AO8 of extension module 2.
Write example 6)
PORT:0, station:1, ADDRESS:0000, Extra1:PID1, Extra2 : 0
The setting parameter shown above is 1st analog value setting example for PID1.
Write example 7)
PORT:0, station:1, ADDRESS:0001, Extra1:ACO, Extra2 : 0
The setting parameter shown above is analog value setting example for ACO2.
Connection of main power, communication cable and extension module are as follows.
Connection of main power
Please connect 24V AC power to 91, 93 connector such as <Figure 4>.
 |
| <Figure 4> Connection example of main power and communication cable to DX9100 controller |
Connection of communication cable
Please connect RS-485 communication cable to RT+, RT- connector such as <Figure 4>.
DX9100 controller computer (RS-485)
RT+ ------------------------ + connector
RT- ------------------------ - connector
Connection of extension module
Please connect extension module to RT+, RT- connector respectively.
After the connection, you can set and download for extension module by using `GX9100¨ program.