DAE GIL EL-300P Load Communication Driver is the driver to communicate with Programmable Digital DC Electronic Load of DaeGil Electronic Co., Ltd. in Korea.
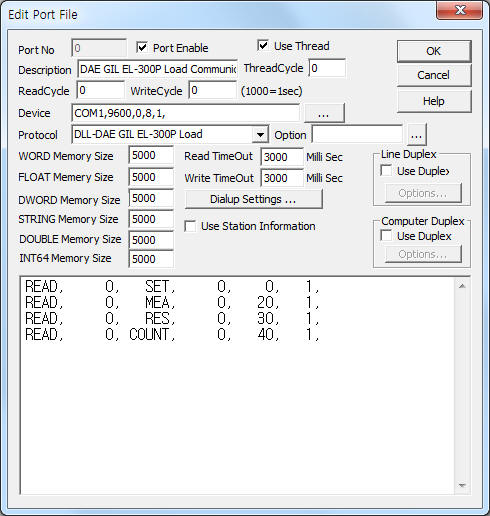
<Figure 1> is read setting example of DAE GIL EL-300P Load communication driver.
 |
| <Figure 1> Read setting example of DAE GIL EL-300P Load communication driver |
Device part of <Figure 1> input Com Port(COM1), Baud Rate(9600), Parity Bit(0), Data Bit(8), Stop Bit(1) respectively.
DAE GIL EL-300P Load communication driverí»s read schedule
Read schedule setting parameters are as follows:
1) STATION – Don't care.
2) Read Command – Command = L_STS, MODEL, LED, SET, MEA, RES, COUNT ( Refer to <Table 1> )
3) Read Start Address – Don't care.
4) Save start address for Communication Server – Saving start address of Communication Server.
5) Read Size – Fixed to 1.
Read schedule example)
READ, 0, SET, 0, 0, 1,
READ, 0, MEA, 0, 20, 1,
READ, 0, RES, 0, 30, 1,
READ, 0, COUNT, 0, 40, 1,
<Table 1> is store values and contents of DAE GIL EL-300P Load communication driver.
| Read command | Contents | Store Values |
Range ( Decimal ) |
| L_STS | Read of load status | Start Addr + 0 =Local/Remote status |
0 = Local, 1 = Remote |
| MODEL | Read of load model | Start Addr + 0 = Watt Limit, Start Addr + 1 = Volt Limit, Start Addr + 2 = Current Limit |
65 ( 210W ) ~ 80 ( 15750W ), 65 ( 63.00V ) ~ 68 ( 210.0V ), 65 ( 40.00A ) ~ 72 ( 840.0A ) |
| LED | Read of LED status | Start Addr + 0 = LED Status |
Refer to <Table 2> |
| SET | Read of setting status | Start Addr + 0 ~ 17 |
Refer to <Table 3> |
| MEA | Read of measurement status | Start Addr + 0 = Voltage, Start Addr + 1 = Current, Start Addr + 2 = OTP |
voltage, current = read value / 100( floating point data ) OTP : 0 = normal, 1 = high temperature |
| RES | Read of resistance | Start Addr + 0 = Resistance value |
Floating point value ( Refer to FLOAT memory ) |
| COUNT | Read of Count value | Start Addr + 0 = Count value |
Current count value |
| <Table 1> Store values and contents of DAE GIL EL-300P Load communication driver | |||
Bit position |
Contents |
Remarks |
15 |
Don't care ( always 1) |
1 = LED ON,
0 = LED OFF |
14 |
? |
|
13 |
Load C |
|
12 |
Load B |
|
11 |
Load A |
|
10 |
OTP |
|
9 |
OPP |
|
8 |
OCP |
|
7 |
OVP |
|
6 |
4A |
|
5 |
DYN |
|
4 |
STA |
|
3 |
CV |
|
2 |
CR |
|
1 |
CC |
|
0 |
Load ON |
|
| <Table 2> Each bit contents of LED status | ||
Store Values |
Contents |
Start Addr + 0 ~ 2 |
CC Load A, B, C |
Start Addr + 3 ~ 5 |
CR Load A, B, C |
Start Addr + 6 ~ 8 |
CV Load A, B, C |
Start Addr + 9 ~ 11 |
CP Load A, B, C |
Start Addr + 12 |
FRQ |
Start Addr + 13 |
DUTY |
Start Addr + 14 |
L -> H |
Start Addr + 15 |
H -> L |
Start Addr + 16 |
Load H |
Start Addr + 17 |
Load L |
| <Table 3> Store values and contents of setting status read command | |
DAE GIL EL-300P Load communication driver store the same data in WORD, DWORD, FLOAT memory, but the data formats are different.
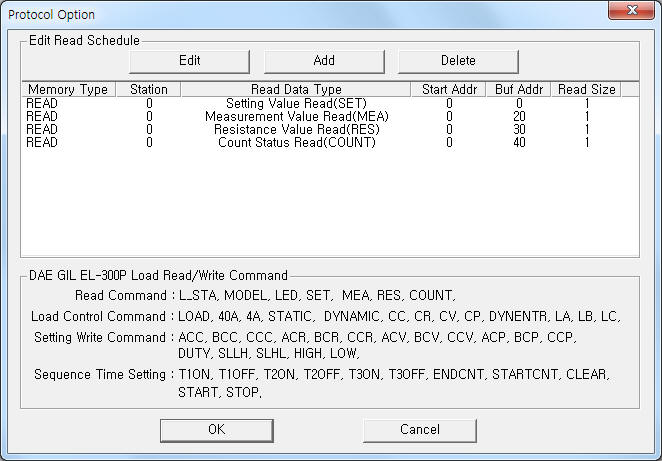
If you click the icon ![]() in protocol option part, you
can see the dialogue box such as <Figure 2>. you can also set read schedule by
using this part.
in protocol option part, you
can see the dialogue box such as <Figure 2>. you can also set read schedule by
using this part.
 |
| <Figure 2> Example of DAE GIL EL-300P Load communication driverí»s Option dialogue box |
You can set read schedule by using ![]() ,
, ![]() ,
, ![]() button and listbox
of <Figure 2>.
button and listbox
of <Figure 2>.
 |
| <Figure 3> Example of DAE GIL EL-300P Load communication driverí»s read schedule Add/Edit dialogue box |
When you click Add button or Edit button in dialogue box of <Figure 2>, dialogue box of <Figure 3> is shown.
You can write the setting value by using write settings.
Bit Write
Bit write and word write have the same setting parameters except output value. ( 0 , 1 )
Word Write
Word write setting parameters are as follows:
1) PORT Port no. (0 ~ 255)
2) STATION Don't care.
3) ADDRESS Decimal unit saving start address for read command(L_STS, MODEL, LED, SET, MEA, RES, COUNT).
Write command : Don't care.
4) Extra1 Read/Write command.
Read command = L_STS, MODEL, LED, SET, MEA, RES, COUNT. ( Refer to <Table 1> )
Write command = Refer to <Table 4>.
5) Extra2 Don't care.
| Write Command | Contents | Output value |
Remarks |
| LOAD | Load ON/OFF | 0 = Load OFF, 1 = Load ON |
Load control command |
| 40A | Setting of 40A | Don't care |
|
| 4A | Setting of 4A | ||
| STATIC | Setting of STATIC | ||
| DYNAMIC | Setting of DYNAMIC | ||
| CC | Setting of CC | ||
| CR | Setting of CR | ||
| CV | Setting of CV | ||
| CP | Setting of CP | ||
| DYNENTR | Setting of DYNENTR | ||
| LA | Setting of LA | ||
| LB | Setting of LB | ||
| LC | Setting of LC | ||
| ACC | Setting of ACC | 4 digit decimal ( 0 ~ 9999 ) |
Current or etc setting |
| BCC | Setting of BCC | ||
| CCC | Setting of CCC | ||
| ACR | Setting of ACR | ||
| BCR | Setting of BCR | ||
| CCR | Setting of CCR | ||
| ACV | Setting of ACV | ||
| BCV | Setting of BCV | ||
| CCV | Setting of CCV | ||
| ACP | Setting of ACP | ||
| BCP | Setting of BCP | ||
| CCP | Setting of CCP | ||
| FRQ | Setting of FRQ | 5 digit decimal ( 0 ~ 99999 ) |
|
| DUTY | Setting of DUTY | 2 digit decimal ( 0 ~ 99 ) |
|
| SLLH | Setting of SLLH | 4 digit decimal ( 0 ~ 9999 ) |
|
| SLHL | Setting of SLHL | ||
| HIGH | Setting of Load High | ||
| LOW | Setting of Load Low | ||
| T1ON | Setting of T1 ON | 3 digit decimal ( 0 ~ 999 ) |
Sequence time setting |
| T1OFF | Setting of T1 OFF | ||
| T2ON | Setting of T2 ON | ||
| T2OFF | Setting of T2 OFF | ||
| T3ON | Setting of T3 ON | ||
| T3OFF | Setting of T3 OFF | ||
| ENDCNT | Setting of End Count | ||
| STARTCNT | Setting of Start Count | ||
| CLEAR | All Clear | Don't care |
|
| START | Count Start command | ||
| STOP | Count Stop command | ||
| <Table 4> Write command and contents of DAE GIL EL-300P Load communication driver | |||
Write example 1)
PORT : 0 , STATION : 0, ADDRESS : 0000, EXTRA1 : ENDCNT, EXTRA2 :
The setting parameter shown above is an example of End Count setting.
Write example 2)
PORT : 0 , STATION : 2, ADDRESS : 0000, EXTRA1 : START, EXTRA2 :
The setting parameter shown above is an example of Count Start control command.
Write example 3)
PORT : 0 , STATION : 2, ADDRESS : 0000, EXTRA1 : STOP, EXTRA2 :
The setting parameter shown above is an example of Count Stop control command.
Connection of communication cable and main power line are as follows.
Connection of main power line
Please connect main powert to 'AC INPUT' connector such as <Figure 4>.
 |
| <Figure 4> Connection example of main power line and communication cable to DAE GIL EL-300P Load controller |
Connection of RS-232C communication cable
You have to connect direct RS-232C cable to 9 pin RS-232C connector of DAE GIL EL-300P Load controller.
<Figure 5> shows the appearance of DAE GIL EL-300P Load controller.
 |
| <Figure 5> Appearance of DAE GIL EL-300P Load controller |