If Component Services, Local Security Policy Setting and Adding a Windows Administrator are set up at AutoBase OPC Server side, it needs to same setting at Client side.
DCOM Setting and Adding Authority at Component Services.
Adding a DCOM and Access Active Authority by running a Component Service.

<Figure 1>Component Service run screen
You can run a program like <Figure 2> by using the Direct Instruction like <Figure 1> or by selecting the 'Control Panel | Administrative Tools | Component Services'.

<Figure 2> Component Service Program screen
Select the properties at 'Console Root | Component Services | Computer | My Computer' by using the mouse right button. And complete the settings like <Figure 3> ~ <Figure 10>.

<Figure 3> Window for 'My Computer Properties | Default Properties' of Component Services Program

<Figure 4> Window for 'My Computer Register Information | MSDTC' of Component Service Program

<Figure 5> Window for 'My Computer Properties | COM Security' of Component Service Program
At <Figure 5>, Press the Edit Limits and Edit Default at 'Access Permissions' and 'Launch and Activation Permissions'.
At <Figure 6>, Add an Anonymous Logon account and allow to entire
Authority by using the
![]() button.
button.

<Figure 6> Access Authority setting window

<Figure 7> Select Users or Groups dialog box
Press
![]() button at <Figure 7>, then select Anonymous Logon
Account at <Figure 8> by using the
button at <Figure 7>, then select Anonymous Logon
Account at <Figure 8> by using the
![]() button.
button.

<Figure 8> Viewing All Users or Group screen window

<Figure 9> Anonymous Logon account selecting screen window

<Figure 10> Anonymous Logon account Add/Delete and Allow/Reject selecting screen window
Modifying a Windows Firewall Setting
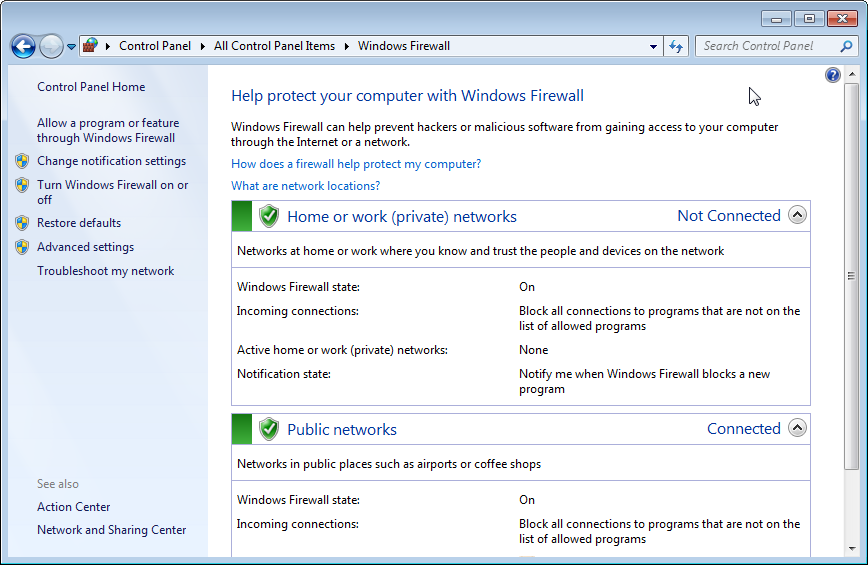
At Windows Firewall Setting, set the OPC Client execute program and OPC communication Local port as an allowed program of Windows Firewall.

<Figure 11> Windows Firewall screen window
If you select 'Windows Firewall | Allow a program of feature through Windows Firewall', dialog box will come up like <Figure 12>.

<Figure 12> Dialog box for setting a program to communicate.
You can allow the additional program by selecting the
![]() button. And if you click this button, you can see the dialog box like <Figure
13>.
button. And if you click this button, you can see the dialog box like <Figure
13>.

<Figure 13> Dialog box for Adding a Program
Select a program which you want. And click the
![]() button when you complete selecting.
button when you complete selecting.
If you complete the settings to this step, set the Inbound Rules by following <Figure 14> ~ <Figure 20>.
You can set the TCP and Specific local ports which are used by OPC, at these steps.
<Figure 14> come up by selecting the 'Windows Firewall | Advanced settings'.

<Figure 14> Windows Firewall with Advanced Security dialog box
Select the Inbound Rules items by using the mouse right button like <Figure 14>.

<Figure 15> Rule Type of New Inbound Rule Wizard dialog box
At this dialog box, select a Port item, and move on to the next step.

<Figure 16> Protocol and Ports of New Inbound Rule Wizard dialog box
Applying a rule as TCP and Specific local ports (No. 135) like <Figure 16>.
Move on to the next step when you complete the settings at this step.

<Figure 17> Action of New Inbound Rule Wizard dialog box
Select the Allow the connection item like <Figure 17>.
Move on to the next step when you complete the settings at this step.

<Figure 18> Profile of New Inbound Rule Wizard dialog box
Set the check box like <Figure 18>.
Move on to the next step when you complete the settings at this step.

<Figure 19> Name of New Inbound Rule Wizard dialog box
Write down the name and description.
If you complete writing down the name and description, press the
![]() button.
button.

<Figure 20> Screen for finished Inbound Rules
Importance) There is case of No Access to OPC Server, even if you complete the setting about OPC Client computer as above. In this case retry to execute after copying an file in OpcServer folder and registering the AutoBase OPC Server
Relate items)